Recently, we were tasked with taking over an older server that was running Windows Server 2012. The server was several years old and used slow hard disk drives that were showing SMART errors, and the server would hang whenever a reboot was done.
We, therefore, decided it was important to upgrade to new hardware and, ideally, upgrade the OS to a newer version of Windows. Doing an OS upgrade in a live environment is a bad idea, and we wanted to avoid rebooting at all or taking down the client sites during maintenance.
To image a Windows Server while running in a live environment (i.e., without rebooting into a live USB or CD) requires specialised software that can handle disk imaging without interrupting the server’s operations. There are several free tools available that meet these criteria and offer features like automatic uploading to FTP or saving via SMB network shares. Below, I will recommend some suitable software and provide a step-by-step guide on how to use them.
Table of Contents
Recommended Software
There are several applications you can use to image a Windows server.
1. Disk2vhd
- Description: Disk2vhd is a free utility from Microsoft’s Sysinternals Suite that allows you to create VHD (Virtual Hard Disk) images of your Windows environment while the system is running.
- Pros: Lightweight, easy to use, no downtime required.
- Cons: Creates VHD instead of ISO, but can be converted to ISO if needed.
2. Win32 Disk Imager
- Description: Win32 Disk Imager is a tool primarily used for writing images to USB devices but can be used to create raw disk images.
- Pros: Simple interface, creates raw disk images.
- Cons: Requires additional steps to convert to ISO.
3. AOMEI Backupper
- Description: AOMEI Backupper is a free backup and cloning tool that supports creating disk images in a live environment.
- Pros: User-friendly interface, supports network shares for saving images.
- Cons: Requires a conversion tool for ISO creation.
4. DriveImage XML
- Description: DriveImage XML is a free imaging and backup solution that supports live imaging of Windows systems.
- Pros: Simple to use, supports network destinations.
- Cons: Does not directly create ISO files.
Step-by-Step Guide Using Disk2vhd
Here’s a detailed guide on using Disk2vhd to create a VHD image, convert it to ISO, and upload it to an FTP or SMB network share.
Step 1: Download and Install Disk2vhd
- Download Disk2vhd: Download the executable from the official site.
- Run the Program: Since Disk2vhd is portable, you don’t need to install it. Simply run the executable.
Step 2: Create a VHD Image

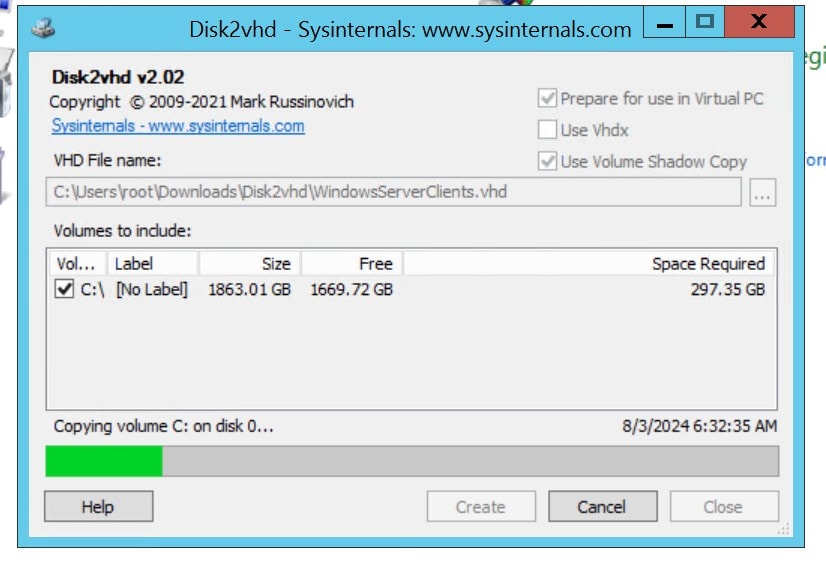
- Select Volumes: Open Disk2vhd and select the volumes you want to include in the VHD image. Ensure that you select the system partition (usually C:) and any other partitions relevant to your server.
- Destination Path: Choose a destination path for the VHD file. This should be a location with enough space to store the complete image.
- VHDX Option: You can choose to create a VHDX file for larger disk support and better resilience (VHDX is a newer format supported by Hyper-V).
- Create the Image: Click “Create” to start the imaging process. Disk2vhd will work in the background, allowing you to continue using the server.
Optional Step 3: Convert VHD to ISO
VHD images are designed to work with Microsoft Hyper V, but when hosting using virtualisation, we use Proxmox, so you will want to convert the image to an ISO.
After creating the VHD image, you’ll need to convert it to an ISO file using a tool like OSFMount and ImgBurn.
Step 3.1: Mount VHD using OSFMount
- Download OSFMount: Get OSFMount from OSFMount’s website.
- Mount VHD: Use OSFMount to mount the VHD file as a virtual drive.
- Check Drive Contents: Ensure the mounted drive appears correctly and contains all expected data.
Step 3.2: Convert to ISO with ImgBurn
- Download ImgBurn: Install ImgBurn from ImgBurn’s website.
- Create ISO: Open ImgBurn and select Create image file from files/folders.
- Select Source: Use the mounted VHD as the source for the ISO file.
- Choose Destination: Specify the location to save the ISO file.
- Build ISO: Click the “Build” button to create the ISO file from the VHD.
Step 4: Upload ISO to FTP/SMB
You can automate the upload of the ISO file to FTP or SMB network shares using built-in Windows features or third-party tools like WinSCP.
Step 4.1: Upload to FTP
- Download WinSCP: Get WinSCP from WinSCP’s website.
- Create a Script: Create a WinSCP script for automated upload.
   open ftp://username:[email protected]
   put C:\Path\To\Your\ISO.iso /remote/path/
exit- Schedule Task: Use Task Scheduler to run the WinSCP script after the ISO creation.
- Open Task Scheduler.
- Create a new task and set the trigger to start after Disk2vhd completes.
- Set the action to run the WinSCP script.
Step 4.2: Upload to SMB
- Use Command Line: Use
net usecommand to map the SMB share and copy the file.
   net use \\server\share /user:username password
   xcopy C:\Path\To\Your\ISO.iso \\server\share\
net use \\server\share /delete- Automate with Batch Script: Save the above commands in a
.batfile and schedule it using Task Scheduler, similar to the FTP upload process.
Step 5: Verify ISO Integrity
After the upload, verify the ISO file’s integrity to ensure it was created and transferred correctly. You can use tools like HashTab to compare hash values.
Conclusion
Using Disk2vhd allows you to create a VHD image of your live Windows Server environment without downtime. The process involves creating a VHD, converting it to ISO, and automatically uploading it to FTP or SMB network shares using scripts and Task Scheduler. This method is efficient for backing up or migrating server environments without interrupting services.
If you prefer a more graphical interface or additional features like differential backups, consider AOMEI Backupper Standard or DriveImage XML, although they may require extra steps for ISO creation.


